A
Free Minimalist Urine-diverting Dry Toilet (UDDT) for the Unhoused, Poor or
Disaster-stricken
(This was first graciously published at
http://www.phlush.org/2013/10/14/a-minimalist-costless-urine-diverting-dry-toilet-uddt-for-the-unhoused-poor-or-disaster-stricken/
after they had asked me about simple options for homeless people.)
(Para español, vea:
http://inodoroseco.blogspot.com/2013/11/un-inodoro-seco-sin-costo-que-cualquier.html.)
http://inodoroseco.blogspot.com/2013/11/un-inodoro-seco-sin-costo-que-cualquier.html.)
Shifting from wasteful, expensive, contaminating, water-based toilets to
decentralized, environmentally friendly, dry toilets should be more a matter of
paradigm shift than capital investment. This is especially true for those who
have little money, are potentially living on the street, or are in the upheaval
of an emergency.
The key things that a UDDT needs to do are: (1)
jail up the potentially dangerous feces that may transmit many terrible
diseases (including diarrhea, cholera, typhoid, and intestinal worm eggs) long
enough for these to die and (2) set the urine free on the soil, where
it is excellent fertilizer for the plants and transmits no disease. This
separation also greatly reduces the potential for stench and keeps the volume
of dangerous material small and manageable.
The following minimalist toilet is entirely functional and is made with
just a few readily available materials that can be rescued from the garbage:
- Two 4-liter plastic bottles, like those used to sell bleach.
- 50 centimeters of tape.
- 2 meters of string.
- Four sticks, 25 centimeters long (or a box the right size).
- Some normal, woven, polypropylene sacks, like those used to sell 100 pounds of flour, rice, or whatever. Biodegradable, jute bags (like coffee sacks) can also be used and even have an advantage (see #7, below).
- A small sheet of plastic.
Instructions
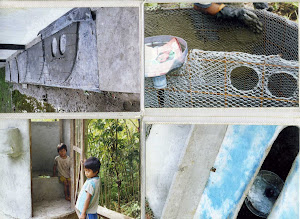
(1) Make a portable, ecological urinal from the two
bottles, cutting one diagonally (as shown) and joining them together
mouth-to-mouth with tape and then firmly with string. This is a very useful
item, even if one has a more up-scale outhouse, as it can be used for peeing
next to bed in the middle of the night, without having to go out into the dark
among snakes, insects, rapists or other creatures. It can also be used during
the day wherever there is enough privacy.

While standing with urine in it, this urinal emits very little smell,
since the mouths of the bottles are small and the top bottle blocks the movement
of air across these mouths. Each day, it gets rinsed with water to avoid smell
developing with the fermentation of the urine.
This costless urinal is very practical for collecting urine, diluting it
with at least three times as much graywater, and pouring this excellent
fertilizer on the soil among one’s crop plants … or among the ornamental plants
in the city park to help them flower more beautifully. One could also dump
the urine into a sewer drain, but that would waste the nutrients, increase public
spending on wastewater treatment, and contribute to the formation of anoxic
dead zones in rivers and oceans.
(2) Push the four sticks into the ground, to a
height of about 12 centimeters. If one prefers (or especially if the floor is
cement and you cannot poke sticks into the ground), a cardboard, wooden or
plastic box the right size could be used instead of the sticks.

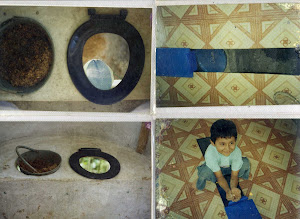
(3) Roll down the edge of the sack and place it over
the sticks. Put in a cup of dry soil where the first deposit will fall. If
you like, a layer of dry leaves can be placed in the bottom of the
sack first.


(5) Put a cup of dry soil on top of the
feces to cover them, control the smell, keep flies from laying their eggs, and
inoculate them with beneficial decomposer soil microbes. Keep a stick in the
sack to accommodate the feces and paper, facilitate them being covered adequately
by the soil, and fill the space in an orderly way (always grabbing the
non-sh*tty end of the stick). One of the best soils for this consists of the
decomposed feces from a previous cycle, as seen here, with some sawdust mixed
in if it is too compact.

(6) When not in use, cover the whole thing tightly
with a sheet of plastic to keep rain, flies and curious eyes out.

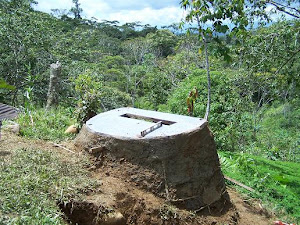
(7) When full (to a height of nearly the 12
cm), or when the users are moving on, tie the sack shut with a
tag that says something like, “Open this package of rich organic soil only
after XX/X/20XX (say a year from now) when it is safe to use in agriculture”
and hide it somewhere protected against the rain and sun, like under a bridge.
Another option would be to bury the sack, preferably in dry, well aerated soil
(potentially under that same bridge). These sacks could also be stacked on a layer of rocks or sticks and covered with a sheet of plastic to protect them from the rain (maybe under a tree to protect the plastic from the sun).

The feces should dry and decompose for at least 6 months in the Tropics
or a year in Temperate Countries (longer if buried in the soil), so that the
pathogens die and it is no longer dangerous.
If the users are there long enough, or come back, they can use this new
soil themselves in agriculture, or recycle it as an excellent cover material
for new feces in the UDDT once again. More fecophobic people might want to only
put it in the bottoms of holes for planting trees, which is also a great use.
The advantage of using biodegradable, jute sacks is that one can just
throw the recently filled sack in the bottom of a hole, plant a tree on top of
it, and forget about it (until you wonder why the tree is growing so fast and
with such luscious fruits).
(Continue reading for a discussion of this system here.)
(Continue reading for a discussion of this system here.)


